


How to Use a Soup Maker: The Morphy Richards Way
So, you’ve just bought a soup maker (or you’re on the verge of hitting that ‘buy now’ button) and you’re wondering how to use it. Well, this is the guide for you! Keep reading and find out everything you need to know about using a soup maker with the Morphy Richards team…
Buying a soup maker?
If you haven’t yet bought your new Morphy Richards soup maker, then we’d highly recommend that you read our super-detailed buying guide first!
In this guide, we cover everything you need to know, including the most common questions we receive about our soup makers.
Guide - The Ultimate Guide to Buying a Soup Maker
Note, if you buy your soup maker directly from Morphy Richards you can not only choose to Pay in 3 with Klarna, but benefit from free delivery (on orders over £60) and an extra year of warranty (when you register it with us).
How to use a soup maker: the basics
Okay, ready to begin? Then let’s kick off with some basics that will apply regardless of which program you decide to use when making your soup.
Preparing your ingredients
The way in which you prepare your ingredients has a big impact on the end result.
Whether you’re adding root vegetables such as potatoes and carrots, marrows such as cucumbers, or cruciferous vegetables like cabbage or cauliflower, it’s essential that you chop them well.
Ideally, use a sharp knife and make sure that your vegetables are both well and evenly chopped. This will ensure the vegetables heat and cook consistently.

The same goes for any meats that you decide to add to your soup maker. Whether you’re adding beef, pork, lamb, chicken, or fish you want to ensure that the meat is well and evenly chopped. Again, this will ensure that the meat heats up consistently.
Note - soup makers aren’t designed to cook meat. So, any meats that you decide to add to your soup maker must already have been pre-cooked. The soup maker is designed to ‘heat up’ meat as part of a soup rather than cook it through.
Ensuring that your ingredients are consistently and well chopped will not only make sure they heat up consistently, but will also make it easier for the soup maker’s blending blade to cut and blend them.
Fill to the correct level
Another ‘basic’ that applies to all soup maker programs is ensuring that you fill the soup maker to the correct level.
At Morphy Richards, we’ve made it super easy to do this by adding a set of lines on the side of our soup makers. Just make sure that your ingredients sit in between these two lines and you’ll be fine.
Add the right amount of water
It’s also important to add the ‘right’ amount of water to your soup maker. What exactly the ‘right’ amount of water is, is very much dependent on what kind of soup you’re making.
However, too little water, and you risk creating an overly thick soup (which can also burn and stick to the bottom of the soup maker’s jug). Too much water, and you risk ending up with soup that has the consistency of dishwater. Yuck!
So, what is the answer?
The reality - like any other type of cooking - is that it’s mainly a case of trial and error. We’d recommend a few practice runs when you first buy your soup maker. You’ll quickly gain an intuitive understanding of the ‘perfect’ amount of water to add to your soups.
Tip - check out Morphy Richards’ recipe blog which contains loads of soup recipes (many of which tell you exactly how much water to add).
Secure the lid
We appreciate this sounds rather obvious, but always make sure you secure the lid on your soup maker prior to use!
Morphy Richards’ soup makers are super easy to use, and on all our models the lids simply ‘click’ into place.
Using a soup maker’s programs
Even if you’ve only had a quick look at Morphy Richards’ range of soup makers you’re bound to have noticed that each model comes complete with a set of programs that can be activated with the push of a button.
However, if you’re new to the world of soup makers, you may be wondering how they work. Well, wonder no longer! Below, we’ve set out each of the main programs you’ll find on our soup makers along with an explanation as to what they do.
Note - there are four programs that you’ll find on every single Morphy Richards soup maker. However, there are some additional programs available on our higher-end soup cookers.
How to activate the programs on a Morphy Richards soup maker
You’ve just seen that Morphy Richards soup makers are available with a variety of programs; but how exactly do you activate them?
Well, this being Morphy Richards, we’ve made it as easy as possible.
Regardless of which model you’ve purchased, the programs are activated in the same way.
Once your soup maker is plugged in (and suitably loaded with ingredients and water), you simply need to secure the lid and press the ‘mode’ button. Repeatedly pressing this button will allow you to cycle through each program or function on the soup maker. You’ll be able to see which program/feature is currently selected as a small red LED will appear above it (see picture below):
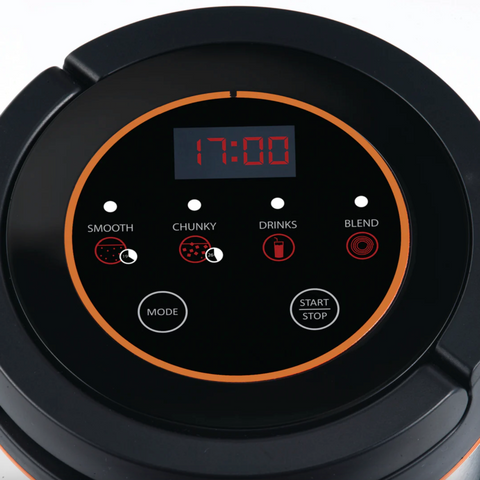
Once you have decided upon a program, you just need to press the ‘Start/Stop’ button. This will activate the program and begin the cycle.
With the program activated, the LED display will display the progress of the cycle, displaying what the soup maker is currently doing (e.g. heating, blending, resting, completed).
Once the program cycle has finished, you’ll not only be greeted with a ‘completed’ symbol on the LED display, but your soup maker will beep for a period of 60 seconds.
Smooth
This is arguably the most ‘iconic’ program associated with Morphy Richards soup makers. It’s the program which does all the hard work of making soup, both heating and blending ingredients to leave with a tasty, smooth soup.
So long as you have added ingredients to the appropriate level and a sufficient volume of water, the smooth program will create your soup in as little as 19 minutes.
In terms of how this program works, it is based on the interaction between the soup maker’s heating element and its blending blade.
Once you’ve pressed the ‘smooth’ button (which is located on the lid of the soup maker) the soup maker’s heating element will turn on, heating up the ingredients and water from the bottom of the soup jug up. From then on until the end of the program, the blending blade will intermittently engage, chopping the ingredients into a smoother consistency.
This cycle of heating and blending has been finely tuned by Morphy Richards to ensure you end up with a great tasting, smooth soup.
Tip - all Morphy Richards soup makers have a ‘blend’ button which allows you to manually activate the blending blade. This means you can further blend your soup at the end of a program’s cycle, further ‘fine-tuning’ the finish of your soup.

Chunky
The next program you’ll find across all of Morphy Richards’ soup makers is ‘chunky’. As the name suggests, this program is designed to create delicious, comforting, chunky soups with the press of a single button.
Like the other programs on our soup makers, all you need to do is fill the soup maker’s jug with the perfect amount of ingredients (between the two lines marked on the outside of the jug). Add in an appropriate amount of water, secure the lid and press the ‘chunky’ button. Easy!
Given that this program is designed to create chunky soups, you’ll find that only the heating element is engaged for the duration of this program. The blending blade will not engage; which is why it’s important to have diced your ingredients to the correct proportions before adding them to the soup maker.
In total, the chunky program lasts for as little as 26 minutes.
Tip - if you find that the resulting soup is a little too chunky, you can always use the ‘blend’ button to fine tune the consistency of your soup.
Note - whilst the chunky program will heat up your soup, it won’t cook meat. Any meats you add to the soup maker must be pre-cooked.
Blend
Another button that you’ll see on every Morphy Richards soup maker is the ‘blend’ button. In contrast to the smooth and chunky buttons, the blend button isn’t a program but is instead a function that allows you to manually activate the blending blades for a short burst of activity.
As we’ve mentioned above, the best way to think about the ‘blend’ button is as a way to manually fine tune your soups so you can achieve your desired consistency.
Like the other programs and features you’ll find on Morphy Richards soup makers, the blend function can be activated by pressing the ‘Mode’ button until the red light appears above ‘blend’. You can then activate the blend feature by pressing the ‘Start/Stop’ button.
Note - the blend function on Morphy Richards soup makers is fitted with a safety feature. If the blend function is used for more than 20 seconds a safety cut out will activate. This is to prevent overheating of the blending motor. After 10 seconds of ‘rest’ you’ll be able to once again use the blend function.
Drinks/Smoothie/Juice
Pick up any Morphy Richards soup maker, and you’ll find a program that goes by one of three names; ‘drinks’, ‘smoothie’ or ‘juice’.
Whilst they may be labelled differently on different soup makers, this program is designed to operate in the same way; to provide you with a means of quickly and easily creating a delicious, cool drink, smoothie or fruit juice.

In smoothie mode your soup maker will use the blending blade alone to prepare the ingredients (the heating element does not engage). However, as with the smoothie mode, we strongly recommend ensuring that your ingredients are both thorough and consistently chopped.
The drinks/smoothie/juice mode takes only two minutes to prepare a delicious beverage.
Note - whilst it may be tempting, do not place ice cubes in the soup maker. Save the ice cubes for after you’ve poured your drink out of the soup maker.
Oh no! How to cancel or change a program
We’ve all done it. You’ve come home from a busy day at work, and you’re not fully concentrating. Or the kids are running riot around the house (or, more likely, both).
You’ve loaded up your soup maker, but then selected the wrong program and hit start.
But, worry not. With a Morphy Richards soup maker it's possible to both cancel and change a program with only a few button presses.
Okay, say the soup maker has started on an incorrect program. All you need to do is press the ‘Start/Stop’ button and hold it for two seconds. The LED lights above the program icons will flash.
You’ve now stopped the incorrect program.
If you want to switch to another (correct!) program, all you need to do is press the ‘mode’ button until the LED light appears above the correct program icon. Now hit the ‘Start/Stop’ button and the soup maker will start the correct program. Phew!
Oh no! I’ve forgotten an ingredient!
Picture the scene. You’ve perfectly prepared your ingredients. You’ve lovingly poured them into the soup maker jug, adding just the right amount of water. The lid has easily popped on and your desired program started.
But wait!? What’s that? You’ve spotted an ingredient that you’ve forgotten to add in.
Is it too late? Not with a Morphy Richards soup maker it isn’t!
If you have started either the chunky or smooth program on your soup maker it’s possible to remove the lid and add in those runaway ingredients. However, you should only do this when the blending element is not in operation.
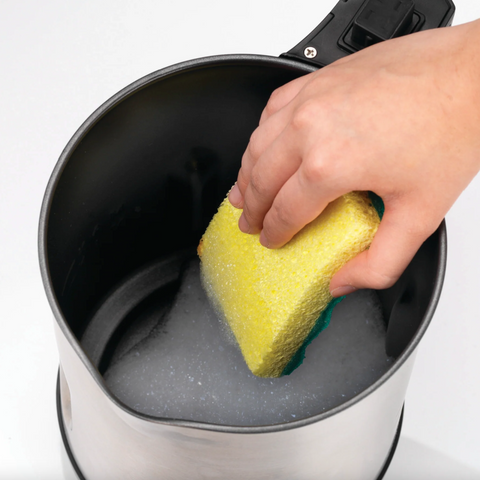
How to clean a soup maker
If you follow the advice above, then you’ll be able to make the perfect soup every time. Of course, once you and your friends/family have enjoyed your soup, it’s time to clean up.
Naturally, at Morphy Richards we want to make the cleaning up process as easy and convenient as the making process.
Which is why cleaning your soup maker is a breeze.
Although not dishwasher safe, Morphy Richards soup makers have been designed to be easy to clean. Simply disconnect the lid from the soup jug and use soup warm water and a sponge to clean them off. It’s really that simple.
Be careful when cleaning the blending blade as this can be sharp. Be careful also not to get water near to any electrical components (e.g. the housing that holds the blending motor or the base of the soup jug that holds the heating element).
On our more premium soup makers, you’ll find a cleaning function. This is activated in a similar fashion to the other programs on the soup maker. Add approximately 800 ml of warm water to the soup jug (along with a small drop of washing up liquid). Click the mode button until the red LED lights up above the ‘clean’ icon. Then press start. The soup maker will then engage in a four-minute cycle. This cycle is designed to dislodge any soup residue that is clinging to the inside of your soup maker.
At the end of the cycle, you just need to empty out the soup jug and give both the inside of the jug, lid and blending blade a wipe down to remove any remaining food debris.
Note - some foodstuffs tend to stick to the bottom of the soup jug (directly above the heating element). If this happens, simply fill the jug with hot soapy water and allow it to sit for 15 minutes. Any burnt food can then be scrubbed away with a cleaning pad.
Our top soup maker tips and tricks
So far you’ve read our essentials on how to use a soup maker. However, there are also some handy hints and tips you may find useful that we’ve shared below…
Read the instruction manual
We know this may sound like a ‘boring’ tip, but you really will benefit from reading the instruction manual that comes with your Morphy Richards soup maker.
Our instruction manuals are really informative and answer the most common questions people have about soup makers.
Not only do our instruction manuals cover the key features of your soup maker, but also user instructions, details on the different programs and even some recipes for you to try out!
‘Sweat’ hard vegetables first
Hard vegetables such as root vegetables like turnip, carrot and potato can sometimes benefit from being ‘sweated’ in a pan. By sweating, we mean gently warming them in a small amount of butter until they gain a glossy appearance (but before they start changing colour).
This starts to release the inherent moisture from within the veg and begins to unlock the starches and sugars.
Doing this prior to adding ‘hard’ vegetables to your soup maker not only makes them easier to blend, but can add an extra element of taste to your soup. Win, win!
Make use of leftovers
Struggling with ways to use leftovers? Then use your soup maker! Soup makers offer the perfect way to use leftovers of all kinds, including many meats and vegetables.
Just pop the leftovers into the soup jug (having made sure they’re chopped properly first!) add some water and fire up the smooth or chunky program. You’ll have a healthy, delicious soup in only a matter of minutes.
Save money and use ‘ugly’ vegetables
A growing number of supermarkets are aiming to tackle food waste by selling ‘ugly vegetables’.
These are vegetables that - in the past - would have been rejected by supermarkets for not resembling what consumers saw as the ‘perfect veg’.
These wonky and/or ugly vegetables are no longer rejected by some food retailers and are often available at cheaper prices than their ‘perfect’ counterparts. In fact, according to some sources, wonky vegetables can be half the price of aesthetically pleasing vegetables.
If you’re going to be making soups, why not save some money and use wonky vegetables instead? You’ll save money, but still end up with tasty soup!
Always thoroughly thaw ingredients
It’s handy and convenient to have a bag of frozen vegetables in your freezer, but make sure that they are properly thawed out before you add them to your soup maker. Adding frozen veg (or insufficiently thawed vegetables) can damage the blending blade in your soup maker.
Don’t use pre-packaged soup
Tempted to pour a tin of soup into your soup maker? Don’t! Morphy Richards soup makers are designed to create fresh, healthy soups from scratch. As such, their cooking programs are delicately calibrated to heat and blend ingredients for the appropriate length of time.
As tinned soups are already ‘pre-cooked’, they’re likely to overcook and be burnt in a soup maker.
Use stock and spices to add flavour!
The judicious use of stock and spices can elevate your soups from good to great. Spices can also be a good way to slightly thicken soups where necessary, adding both flavour and viscosity.
Make room for a Morphy!

Morphy Richards Large Soup Maker
Is it time to make room for a Morphy Richards soup maker in your home? Then buy one direct from us today.
We offer flexible finance options - such as Klarna Pay in 3 - so you can spread the cost of your new soup maker over three easy, interest free payments. We also offer free delivery (on orders over £60).
To top it all off, you can receive an additional year of warranty when you register your soup maker with us.
Shop soup makers at Morphy Richards now
For more home appliance buying guides, inspiration and recipes, explore the Morphy Richards blog…
Want to learn even more about our soup makers? Then read our Ultimate Guide to Buying a Soup Maker